Equipment List:
- Already installed garage door opener
- Radio Shack Relay (125VAC/10A DPDT Plug-In Relay)
- Radio Shack Quick Crimp-On Disconnects (found here)
- GE 45604 Z-Wave Technology Outdoor Module for Lighting Control (at Amazon)
- Two prong extension chord (to be sacrificed).
Process:
- Wire up the relay to the extension cord providing power to the relay. Specifically, cutting off the extension cord and then using the end with the prongs. I've never wired up a relay - so this was a first to me. I used simple wire strippers and cut the wires such that they would fit into the quick disconnects. I crimped them using my wire strippers.
- Wire up the relay to a blank section of the extension cord (just using some of the wire). Added crimps on the end to be connected to the relay and left the end to be wired to the door opener stripped but bare wire.
- Here's what it should look like when all done:

- Add the Z-wave Outdoor Module to my MiCasa Verde. I did this by plugging it in near the Vera, turning it on and having it add it. I referred to it as Garage Door Opener.
- Take everything to the garage and plug it all in. This involves wiring the stripped end of the extension cord to the same wiring terminal as the existing switch and remote control. This is what it looked like for me when it was all done. Note that the Z-wave switch and the relay were just sitting on top of the garage door opener (hopefully things don't move around enough to warrant zip ties).

- Add a scene to MiCasa Verde called "Garage Door" to turn on the switch and then turn it off in 5 seconds (the shortest amount of time possible).

Note: The wiring of the relay should be pretty straightforward. The one I had, there was a simple wiring diagram on the back of it showing the state of the relay when it was open (off).
[Update 2013-12-16]
To add a little bit of clarity to exactly what I am doing with the relay here are some additional pictures and some explanation:


[End Update]
[Update 2013-12-16]
To add a little bit of clarity to exactly what I am doing with the relay here are some additional pictures and some explanation:
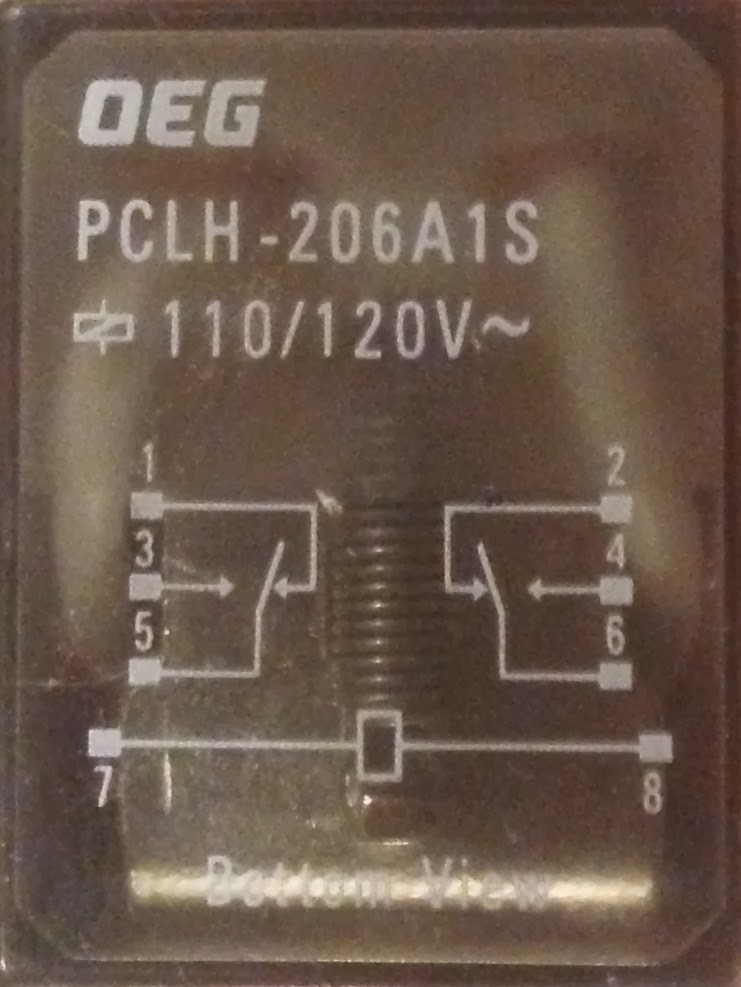
My relay was set up like this; the diagram depicts the configuration of the pins when the power is off. When power is switched on, the link between 2 and 6 or 1 and 5 flips to 4 and 6 or 3 and 5. This is essential to trigger the garage door, which needs a circuit to close for a brief moment (that is what your normal garage door switch is doing).

A little bit hard to tell here, but the power outlet from the Z-wave controller (the two white wires with the blue warning label around it) are plugged into the 7 and 8 poles. The garage door opener is connected to poles 4 & 6 (normally open to one another, but when the relay is active, closed).

Another view from the business side of the relay; here you can see the numbers clearly on the left side of the relay (not used).
After it is installed, you may want to ensure that your previous means of raising and lowering the garage door still work (remotes, hard-wired All set. Assuming the relay is wired correctly, when the scene is run you are good to go.
Bonus Round
I also and almost primarily wanted to know whether the garage door was up or down. To do that, I needed an window or door sensor. I chose an EverSpring Z-Wave Door / Window Sensor. Prior to going to the garage, I added the sensor to the MiCasa Verde.
It turned out to be pretty easy to physically install, the key was finding a spot where I could keep the gap between the sensor to a minimum (less than 40mm) that was added to the door and the portion screwed in to the garage door frame. For me, this required adding a door shim behind the sensor to make sure it was close enough to the magnet in the traveling sensor. After final installation, it looks like the following:

After a few test runs making sure that there was no interference and that the MiCasa Verde was reading the position properly, I declared victory. Victory may be premature - my guess is that this setup may have issues in the cold - there is an air gap at the top of the garage door that might hamper the batteries in the sensor. We'll have to wait and see if that is the case, though. A 4.5V DC power supply could be brought to bear if need be.
Finally, I see the following in the room "Garage Door":

It turned out to be pretty easy to physically install, the key was finding a spot where I could keep the gap between the sensor to a minimum (less than 40mm) that was added to the door and the portion screwed in to the garage door frame. For me, this required adding a door shim behind the sensor to make sure it was close enough to the magnet in the traveling sensor. After final installation, it looks like the following:
After a few test runs making sure that there was no interference and that the MiCasa Verde was reading the position properly, I declared victory. Victory may be premature - my guess is that this setup may have issues in the cold - there is an air gap at the top of the garage door that might hamper the batteries in the sensor. We'll have to wait and see if that is the case, though. A 4.5V DC power supply could be brought to bear if need be.
Finally, I see the following in the room "Garage Door":
