Saturday, April 11, 2020

Sunset to Sunrise Lighting

In Outdoor Lighting Quest, I described my 2012 decision to make all of the lights on the outside of my house to be LED.  Lighting is the first line of defense for home safety.  My calculations showed that after three years, I would have saved ~$375, which would have been through 2015.  I ultimately sold that house in May of 2019, and my calculations showed that I actually saved about $1,400 or $200/year.  Not bad and that was with much more expensive LEDs.

One of the first things I wanted to get sorted out at my new house was getting lighting at all of the entrances of the house to be on from dusk until dawn.  At my last house, I did this Z-wave light switches and initially with a MiCasa Verde and eventually with a Samsung SmartThings hub.  It worked for the most part, but some of the lights would somehow routinely get "forgotten" by the system and I would have to reset them and re-add them.  It was a mild hassle and less reliable than I really would have liked.

When we moved into our current house, the lights on the front of the house (garage and front door) were on timers.  It worked reasonably well, but you have to strike a balance between the lights turning on too late during the winter and too early in the summer.  I looked around for a better way.

Simple Zwave switches are about $20 now.  I could have replaced the timers with Z-wave switches, but the "forgetfulness" of the system concerned me.  After a bit of research, I decided to go with relatively simple Honeywell FBA 36045 switches.  They were about $30 each (meaning that I spent $150 to avoid having to turn on and off the outside lights everyday).  They are timer-based, but you put in your latitude and longitude and it will adjust your on and off times to match the calendar.  It seemed like a pretty useful solution if it worked.

I started on switches that currently did not have timers on them - the basement entrance light and the door to the Sun Room.  The installations went fine; both had easily accessible neutral wires, which would be the killer if you didn't have.  In addition, it wasn't too hard to figure out which of the black wires was load versus hot.  It took a little bit of reading, but it turns out programming them isn't hard at all.  The latitude and longitude can only be put in as a whole number (which is admittedly probably fine), but it felt like the nearest 10th might have been better.  The switches have been working well since they were installed around March 22nd. 

Two days ago, it was crazy windy and the power flickered here a bit.  One of the time switches appeared to have died (and was just leaving the lights on).  It didn't bother me too much, given that I had already replaced all of the outside lights with LEDs, but it is still wasteful.  The two Honeywell switches that I had recently installed weathered the flickering without problems - they purport to have a battery that will keep the time for up to four hours.

I decided today to add one to the side door and replace the timers on the front and garage lights.  I was successful, but it did take some time.  After some careful rewiring, they all seem to be set up properly, but we'll find out for sure this evening and tomorrow morning.

These new switches will not be saving me money, ultimately costing me more, given that I will have three fixtures on from dusk until dawn.  But, now all of my house's entrances are lit at night.  And it should only cost me ~ 12 hours x 365 days / year x 12 light bulbs x 3.3 W x $0.12/kWh = $20.80/year.  Almost a steal.

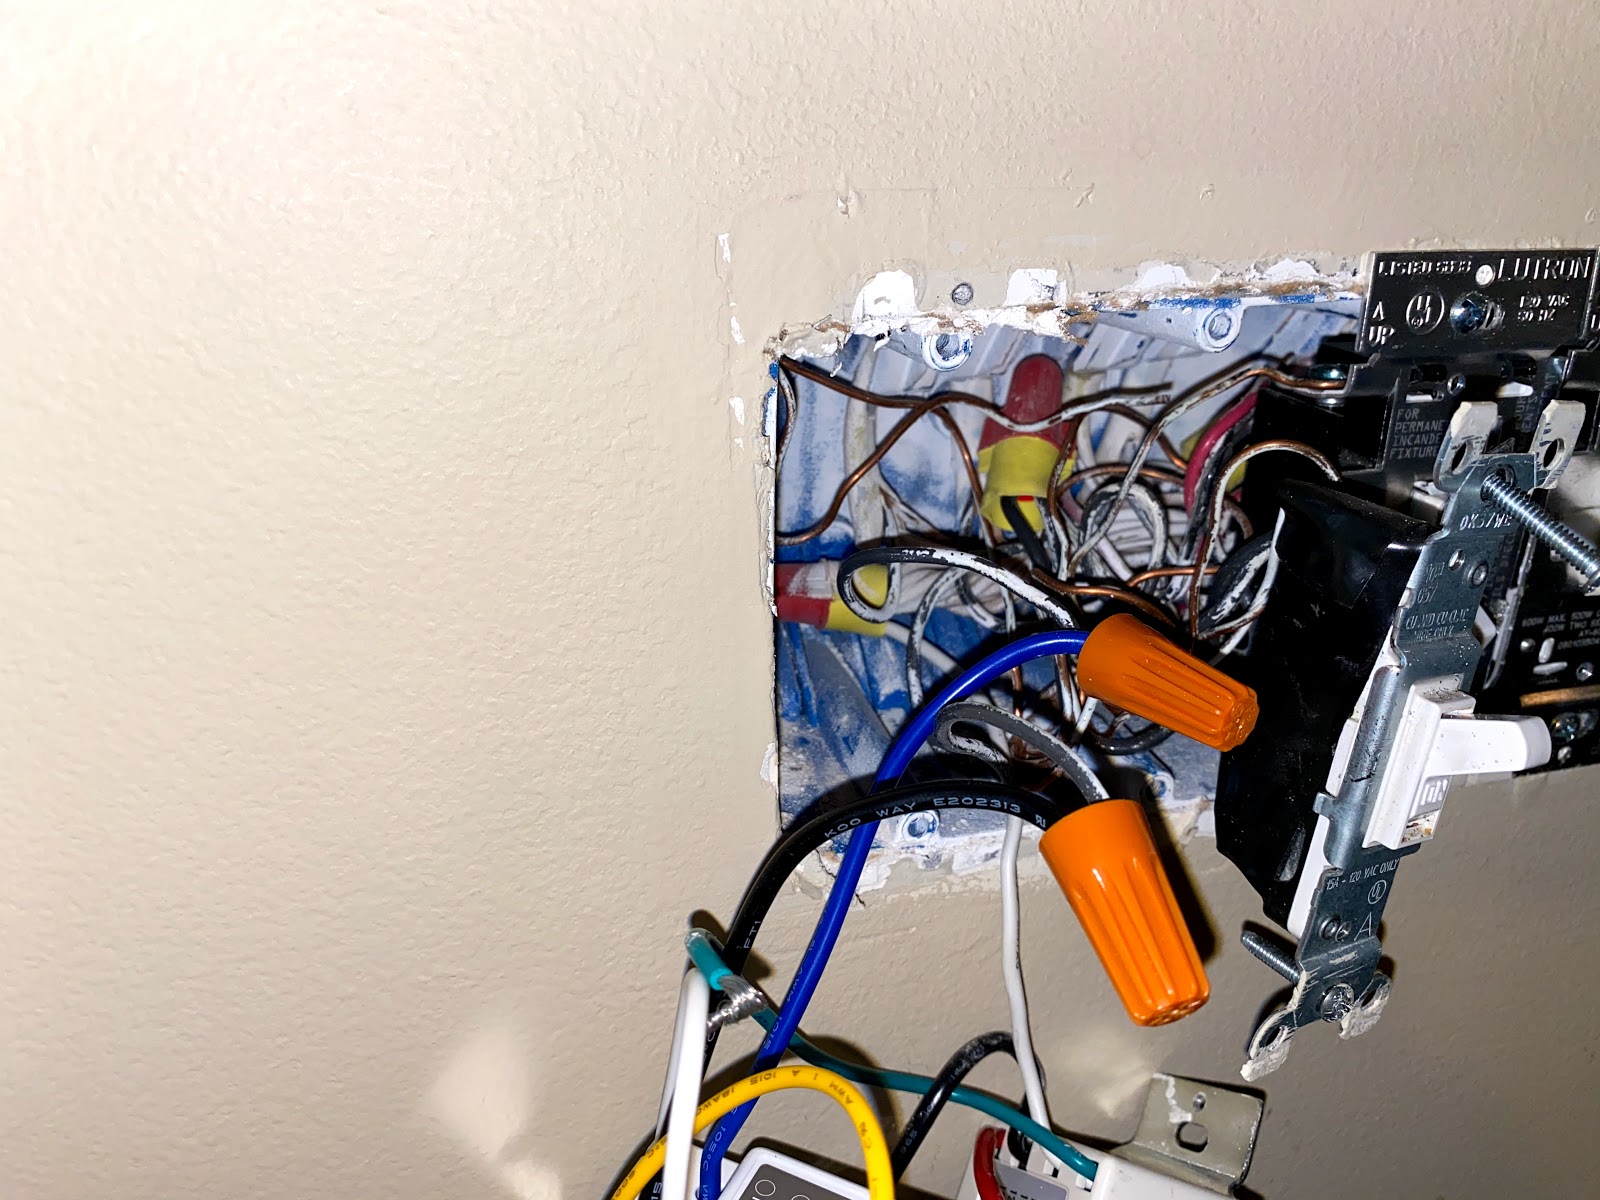
The light switch in the dining room was absolutely packed with wires!

Not to be outdone, the one in the hallway was loaded up with two dimmer switches and a timer switch.  Only one of the four was a normal skinny switch and that one was a three-way (so not super skinny).

All done with the hallway (garage door) light switch.  Waiting on a new faceplate for the one to the side of the house.


I'm approaching an all-LED home.  I made progress on two difficult lights today when I had a burst of energy.  The first (smaller) one was not that hard, it just required another trip downstairs to get a large board to place the light on its side to do the exchange.  The larger light proved much more troubling, though with a ladder, a thick book and long arms, I was able to get it done.  I hope to never have to replace any of these lights through the remainder of my ownership in this house.

Undergoing light bulb replacement surgery on the back staircase light

It is bright and all bulbs are functioning

The thick book has already been removed, but this was the proof shot that all of the bulbs were replaced and they are pretty bright (eight of them)


I have a few areas still left to conquer:
  • Six lights in the kitchen are still incandescent due to the LED bulbs of the same number are too long and won't fit.  I would like to use this light fixture much more than we do and if we had LEDs, I would be inclined to do so.
  • Bookselves don't have LEDs - I couldn't find the right size when I looked for them.  They are also almost never used.
  • Some random bathroom lights upstairs.  I should just get these done.
  • Small lights in the ceiling of the bar downstairs.
  • Lights in the movie theater.  I could have replaced more, but the dimmers won't work with them and they are almost never on.
  • Landscape lighting.  I will undergo this crusade once the weather is reasonably warm and I can be out there identifying both the lights and suitable LED replacements

Sunday, April 5, 2020

Phone to Gigabit Ethernet Conversion

I've been using the desk in the sunroom of our house as my workstation during the Great Hunkering of 2020 (for COVID-19).  It is arguably the nicest and most convenient work area for me.  Unfortunately, my Mac Mini frequently drops the wifi signal, despite my Macbook Pro keeping it without issues.  Perhaps it is the bottom mounting of the Mac Mini that is causing the problems.  Whatever it is, I was in search of a solution.

Today I decided to do something about it.  My initial thought (prior to today) was that I was going to have to drill a hole in the outside wall and run a cable.  I'm sure it would have worked.  However, this morning I decided that I should look to see if there was anything already behind the big wall desk / bookshelf unit that we have.

My workstation during the global pandemic

I did some craning of the neck and smooshing of my head against the wall to see what was up.  Ultimately, I also pulled out my boroscope, but that didn't help my view so much.  What I concluded was that I had both a power outlet and most likely a cable outlet, but that it was behind the rightmost section of the unit.  My expectation was that I would have to buy a pair of Mocha boxes to get the location on the network, but after I did, I would have high-speed connectivity.  After some examination, it looked reasonably simple (six bolts) to remove the unit from the middle piece.  I thought it would be worth doing, so I brought it up with Esther.

Esther was skeptical.  Mostly, I think, she was worried that I would mess up the bookshelf unit and cause unintentional problems.  I assured her that I would go slowly and carefully.  Then I got to work.

The first five bolts came out easily.  I verified that they could be re-inserted easily, too.  The last bolt, of course, was not easy.  Somebody had mostly stripped the hex insert when installing it in the first place.  One size larger Torx head, and I was able to carefully remove it.  Some careful sliding and I was able to see what was up.  It turned out to be a phone outlet.

Bookshelf unit detached and moved enough for me to sneak behind it.  If you look closely, you can see the phone line faceplate removed.

A mess of wires going into the general direction of my desk.  I'm not going to figure out which one is the right one just by noting where they are routed.

My first thought was: bummer, but perhaps I could use the four wires of the phone line to get 100 Mbps ethernet.  So I headed down to the telephone patch panel.  Here's where my luck got good: when the house was built in 2007, they used Cat 5e cables for all of the phone lines.  If my luck held, I should be able to get gigabit ethernet at my desk, not just 100 Mbps.  But, there were a few more steps between point A and point B.

Patch panel in the basement.  Those blue wires are all Cat 5e.  The one headed down to the right (with the grey strain relief cap) is the one heading to my desk.


It took some doing, but after I disconnect all of the phone lines from the patch panel and used my network cable tester (after fully separating the wires), I was able to with pretty high confidence find which wire went to the desk.  Excellent!  I terminated the correct wire and luckily found a straight-through ethernet connector.  I put a short ethernet cable from there and made it to the 1 Gbps switch a few feet away.  Then it was back upstairs to finish the job.

I went through all of my old Lcom gear to find appropriate parts.  I didn't have quite what I thought I needed, but I made it work.  I had a two keyhole faceplace and a blank.  Given the lack of clearance on the wall (due to the bookshelf fitting snuggly against it), I couldn't feed a cable out how one normally would.  So my plan was to get as much of the cable out and then connect.  Sadly, I didn't have another straight-through ethernet connector.  So I rummaged through my bag and found the next best thing.

Eight little connectors added and wall plate secured.

Eight little connectors later, and some mild amount of frustration, I had my connection made.  I then terminated the other end of the ethernet cable and gave it a go in my Mac Mini.  No go.  Sad.  Time to get the cable tester again.  It didn't take too long to figure out that I had poorly terminated the end of the cable that was to go into my Mac Mini.  Frustrating, but I re-terminated the cable and the second time was a charm.  I had System Preferences | Network already open, so I could see the ethernet go from red to green.  I had liftoff.

The final step was to see whether it was just 100 Mbps or 1 Gbps.  For this, I cheated and used Fast.com and got ~ 860 Mbps.  This is clearly a limitation of my FiOS connection, not my desktop link.

Then, everything when back together slowly and carefully: I must have partially screwed in the bolts about 50 times to make sure that no section was overly stressed.  I reshelved the unit and placed all the books back on.