Sunday, July 27, 2025

Learning Crosswords

Many years ago, now, I had decided that I needed to learn how to do crosswords.  It was mostly borne out of two thoughts:

  1. I was approaching 50 and was feeling embarrased that I couldn't do them.
  2. I have some reason to be concerned for risk of Alzheimers.  I have the Apo E 3/4 genotype, which while not at all a death sentance, confers greater risk.  I am hoping that solid learning throughout my life along with lots of Zone 2 or equivalent (and maybe statins) will provide some protection by increasing my cognative reserve.

This post is intended to give you some thoughts on how to approach (and track) your journey.  

Here are my thoughts about how it could go for you and maybe how to approach:

  • Do the online (web-based) versions of the puzzles.  The software avoids having to erase or otherwise deal with logistics.
    • The puzzles do not require a live internet connection.  Load up the puzzle before you head out on a flight or into a dead zone and puzzle away.
    • Master the keyboard for the puzzle - Tab for switching between clues; arrows to move the active tile or switch between across and down.
  • Its gonna be hard.  Like, super frustrating.  Just know that going in.
    • If you need to step away from the puzzle, do so.  Often times, you'll make a lot of quick progress after having focused on something else for 30 minutes or so.
    • All of the online puzzles will pause your timer when the browser tab is not in the foreground.  The WaPo/LAT will do so immediately, the NYT after a few seconds.
  • Solver harder puzzles over time.  What could this mean?
    • Start with mini crosswords.
    • Then graduate to the daily 15x15 puzzles in the Washington Post / LA Times (and 21 x 21 puzzles on Sundays)
    • Finally, graduate to doing both the WaPo/LA Times along with the NY Times
  • Mondays are easiest, Saturdays are hardest.  Sundays are just largest, but usually at a Wednesday/Thursday
    • Set aside accordingly
    • Saturdays will easily take more than an hour when you start
    • Sometimes advanced puzzles will have quirks like a single tile is meant to have two tiles or skip to another point on the puzzle to finish the clue.  Pay attention to the theme and if you are really struggling, think about a clever take on that theme.
  • Build the level of difficulty in "cheating"
    • Initially, let yourself Google answers that are facts.  Yes, you are cheating but, you will be able to solve the puzzle and then see the progress in the future when you don't have to do it.  Also, most frequently, the puzzle creator is not trying to require that you know some super obscure fact to be able to solve the puzzle (especially early in the week).  Try to focus on obvious answers.
    • Learn the small words, especially those with several vowels.  They are favorites of the puzzle creators.  Pop stars with short names (3 or 4 letters) and at least two vowels are favorites (Brian "ENO" or "DUA" "LUPA", for instance).
    • Clues with "?" are plays on words; not to be taken too seriously
    • Longer clues will often be multiple words - this just takes some getting used to.  For instance, wedding vowels ("IDO") and formal agreement ("ASAMI") are reasonably common.
    • Especially as a new puzzler, try to leverage first letters (i.e. if you get an across in the top row, work hard to get all of the downs associated with that word.
    • Related, build to completion by going section-by-section.
    • Many clues have simpler answers than more complex.  Easy advice, hard to keep in mind.
    • Be willing to delete first attempts at words.  Its a balance between being confident in your answers and building around known words and being willing to admit that maybe there is another option.  "SODA" and "COLA" was a recent example for me.  I had the confirmation with the O and A, but it took me way too long (and cost me a check grid) to move off of the COLA in favor of SODA.
  • Allow yourself to liberally check grid at the start (and have the software tell you what tiles you have wrong).  Try to avoid revealing the right answer.
    • As you improve, limit yourself to checking grid until you've spent a certain amount of time struggling with the answers or have gone through all of the open clues at least twice and have not gotten any new tiles filled in.
  • If you are super stuck and at the end of your rope, "Spam Vowels"
    • Put an 'A' in all open tiles and check grid.  Repeat for all of the other vowels and if necessary, 'Y'
    • If you're still stuck after all of the vowels, proceed with the consanants in alphabetical order.
  • Sometimes you get everything but the last letter.  Think hard, but sometimes you just have to go through the whole alphabet before your puzzle clears as done.  Especially early on, don't feel bad about this.
If you are anything like me, you will want to see how you are progressing over time.  My recommendation is to track your statistics in a spreadsheet (either excel or Google Sheets).  It will be helpful to know the following:
  • Date
  • Time to completion
  • Number of times you had to check grid
  • Sum of the number of tiles you had wrong each time you checked grid.  While playing, I will just write down the number and a plus sign between them (10+9+3) and it will help you track both the number of times you checked the grid and the total number of tiles you had in error.
  • A 1 or 0 of whether you spammed vowels
  • A 1 or 0 if you Googled any answers
  • Score (for LAT/WaPo)
From this data, you can present a picture of your improvement over time.  Unfortunately for me, I wasn't collecting the data from the start.  Therefore, much of my fast progress is lost to time.  I also was only tracking time, number of check grids, score and spammed vowels.  After collecting the data, you can create some great graphics to see your progress.  Below are some of mine.  I collect data in Google Sheets and then use R (and ggplot2 and googlesheets4) to make the graphs.


Wednesday, November 25, 2020

Landscape LEDs - a little less power

I have noted in a previous post that I still had yet to convert my landscape lighting system to LED.  Foolishly, I thought warmer weather would be a better time.  In fact, it isn't.  I hate bugs; bugs like warm weather.  If I want to work on the system without bugs around, a bit of a chill is preferred.  This month, I finally got on the system.

First, let me describe my system to you.  I have (pics to follow):

  • 7 post pathway lights (1 broken one in my garage, so no longer used) [30 W]
  • 4 small uplights (on each of the pillars of my house) [30 W]
  • 7 well lights (one of them not quite in a well) [50 W]
  • 6 deck spotlights [30 W]
  • 1 flat spotlight [50 W]

Pathway lights on the garage side of the house

A well light in the backyard

Spotlights coming off the side of the deck

A closer look of a deck light with the outer tube removed

The rear stone wall flat spotlight

Up close to a well light

The connectors of a well light - easy to replace

If one does the math, that leads to total power consumption (assuming all bulbs are functioning, which wasn't always true) of 910 W.  The system was running on an electromechanical timer for 5 hours a day.  Assuming I'm paying 12¢/kWh, that leads to an annual cost of:

365 days/yr • 5 hr/day • 0.910 kWh/hr • 0.12 $/kWh = $199.29/yr

Call it $200.  Not terrible, but money.  I had two objections to the system as it was:

  • Bulbs would die and need to be replaced
  • The timer was only a "good enough" solution.  It would turn on too late in winter and too early in summer.
  • I was spending more money than I needed to get the same amount of lighting and aesthetic benefits.

So on to the LEDs.  I was able to purchase all that I needed on Amazon but from random Chinese brands (VStar, Simba Lighting, and i-Shunfa).  Where are Philips, Sylvania, and GE on this?

This is the replacement impact of the LEDs:

Style Lightbulb Type Bulb Count Original Power (W) LED Power (W) Per Bulb Savings (W) Total Savings (W)
Pathway Light G4 7 30 1.5 28.5 199.5
Small Uplight MR16 4 30 5 25 100
Deck Spotlight MR16 6 30 5 25 150
Well Light PAR 36 7 50 9 41 287
Flat Spotlight G4 1 50 1.5 48.5 48.5
Total 25 785

Substantial savings on a power (Watt) basis, for sure.  You will note that the ratio of original to LED wattage for the pathway lights is very high.  Indeed, I may be misestimating the original incandescents because the 1.5 W LEDs light up the area just about as much as the original bulbs.  For the flat spotlight, however, I will have to replace the 1.5W LED with something much larger to get anything close to the original illumination.

The timer was the other part of the landscape lighting that I didn't like.  When I started researching alternatives (seeking a lat/long timer similar to my wall switches) it finally hit me that I can just use my TP-Link WiFi plug instead.  It was currently being used to turn on for an hour and then turn off a light in my upstairs office to make somebody think that we could be home.  Not a great use case.

I plugged it in, but then found out that I didn't have enough room to plug in the transformer and still get the cover on it.  After starting to research low-profile 90ยบ plug connectors, I realized that one of my extension cords had the same end and probably would do the trick.  It took some fiddling with a velcro strap and then some time to connect to the WiFi, but it is now currently on a dusk-to-11pm schedule and has been working well.

In the end, this is what it looked like:


The cost of running the system now will look more like the following:

365 days/yr • 5 hr/day • 0.125 kWh/hr • 0.12 $/kWh = $27.38/yr

So I will be saving $171.92 per year!  That exceeds the cost of the LEDs of $152.43 (with some spares) and thus my payback period is only 10.6 months (much better than 8 years ago when it was ~20 months).

Finally, I will likely now install the Volt Spotlight Expansion Kit that I've had for a few years.  Originally, I had planned on installing it at my old house.  I decided to pass on that and am now glad that I did.  There are a few additional places I'd like to light up in my back yard (particularly the gate to my back fence) that the addition of the 20 W (and $4.38/yr) that these four lights bring will be worth it.

Wednesday, August 19, 2020

When Technology Hits Muscles

[Originally written on 2020-04-29]
We have recently built out our home gym to include a NordicTrack S22i studio cycle and a NordicTrack X22i treadmill.  Both of them have large screens (~ 22") that are running an old version of Android to run the interface, including the iFit Cardio app that was preloaded onto them.

So far, here are our issues with the S22i:
- 2020-04-26: When connecting the HDMI cable, a (non-bike) workout will stop showing the video after about 4 minutes.  You'll still hear the sound, but the video goes away.  If you run a workout like this without the HDMI cable, it will continue without interruption.
- 2020-04-29: My wife was 58 minutes into a cycling workout and the app just shut down.  After returning to the app, it had lost its place and she couldn't return to her workout successfully.

[Addendum]
Ultimately, I decided to skip the S22i or the treadmill for feeding video into the TV.  After first trying a Google Chromecast, I have settled on an Amazon Fire Stick.  The Chromecast required a device (my wife's iPad) to connect to BeachBody first and then connect to the Chromecast.  She experienced frequent buffering issues and other problems.  I just installed the Fire Stick, but it works well with Beachbody and Plex (for dancing DVDs, though Esther has to verify that the chapter markers were put at useful places).

My next challenge is to side load iFit, so Esther can do non-machine based workouts on the TV and not rely on the smaller screens of the bike or the treadmill.  I'm guessing she won't do that terribly frequently because she's been loving the BeachBody options, but I'd like to have it there in any event.

[Addendum #2, 2020-11-25]
Our gym is pretty much complete, we even have encouraging messages (via vinyl decals) on the walls.  A few notes on how the technology has developed in the gym:
  • I noticed (likely after a spin workout on the S22i) that there was a cable and ethernet jack in the gym alongside the bike.  I decided to find that cable in the network room and was fortunate that I could.  I did have to terminate the cable on the network side, but it wasn't hard.  After that, I hooked up a PoE injector and plugged it into my 24 port switch.  In the gym, I plugged in an ethernet cable, ran it along the outside of the room and installed what had been my outdoor WiFi access point (Ubiquiti).  It is only 2.4 GHz, but from what I could tell, so were the bike and the treadmill (I'm pretty sure the Firestick, as well).
  • The NordicTrack devices are working much much better.  We now almost never have any unexplained shutdowns or workout restarts.  
  • Running Beachbody on the Firestick has worked really well.  While there is some initial buffering, there is almost never a lag in the workout itself.
  • iFit does not have a native FireStick app, as noted above, and sideloading was not successful.  I got it on there, but in the end, I couldn't get it past the screen requiring you to accept the health risks of the device.  Frustrating, but not unexpected due to the apparent crappy software skills of this company.

Overall, I'm pretty happy with how our setup has turned out.  A couple of pics:


Saturday, April 11, 2020

Sunset to Sunrise Lighting

In Outdoor Lighting Quest, I described my 2012 decision to make all of the lights on the outside of my house to be LED.  Lighting is the first line of defense for home safety.  My calculations showed that after three years, I would have saved ~$375, which would have been through 2015.  I ultimately sold that house in May of 2019, and my calculations showed that I actually saved about $1,400 or $200/year.  Not bad and that was with much more expensive LEDs.

One of the first things I wanted to get sorted out at my new house was getting lighting at all of the entrances of the house to be on from dusk until dawn.  At my last house, I did this Z-wave light switches and initially with a MiCasa Verde and eventually with a Samsung SmartThings hub.  It worked for the most part, but some of the lights would somehow routinely get "forgotten" by the system and I would have to reset them and re-add them.  It was a mild hassle and less reliable than I really would have liked.

When we moved into our current house, the lights on the front of the house (garage and front door) were on timers.  It worked reasonably well, but you have to strike a balance between the lights turning on too late during the winter and too early in the summer.  I looked around for a better way.

Simple Zwave switches are about $20 now.  I could have replaced the timers with Z-wave switches, but the "forgetfulness" of the system concerned me.  After a bit of research, I decided to go with relatively simple Honeywell FBA 36045 switches.  They were about $30 each (meaning that I spent $150 to avoid having to turn on and off the outside lights everyday).  They are timer-based, but you put in your latitude and longitude and it will adjust your on and off times to match the calendar.  It seemed like a pretty useful solution if it worked.

I started on switches that currently did not have timers on them - the basement entrance light and the door to the Sun Room.  The installations went fine; both had easily accessible neutral wires, which would be the killer if you didn't have.  In addition, it wasn't too hard to figure out which of the black wires was load versus hot.  It took a little bit of reading, but it turns out programming them isn't hard at all.  The latitude and longitude can only be put in as a whole number (which is admittedly probably fine), but it felt like the nearest 10th might have been better.  The switches have been working well since they were installed around March 22nd. 

Two days ago, it was crazy windy and the power flickered here a bit.  One of the time switches appeared to have died (and was just leaving the lights on).  It didn't bother me too much, given that I had already replaced all of the outside lights with LEDs, but it is still wasteful.  The two Honeywell switches that I had recently installed weathered the flickering without problems - they purport to have a battery that will keep the time for up to four hours.

I decided today to add one to the side door and replace the timers on the front and garage lights.  I was successful, but it did take some time.  After some careful rewiring, they all seem to be set up properly, but we'll find out for sure this evening and tomorrow morning.

These new switches will not be saving me money, ultimately costing me more, given that I will have three fixtures on from dusk until dawn.  But, now all of my house's entrances are lit at night.  And it should only cost me ~ 12 hours x 365 days / year x 12 light bulbs x 3.3 W x $0.12/kWh = $20.80/year.  Almost a steal.

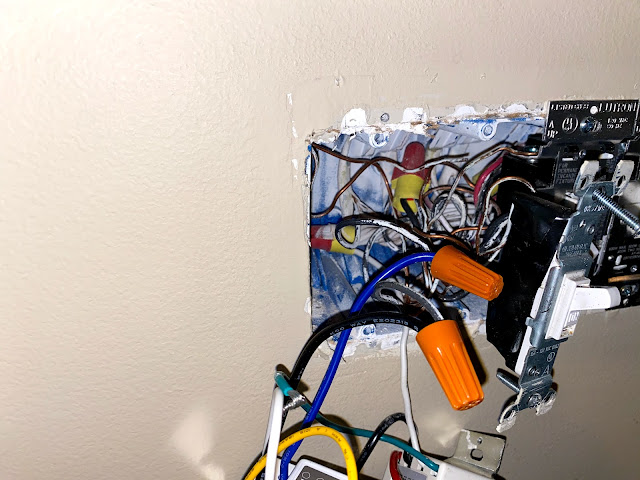
The light switch in the dining room was absolutely packed with wires!

Not to be outdone, the one in the hallway was loaded up with two dimmer switches and a timer switch.  Only one of the four was a normal skinny switch and that one was a three-way (so not super skinny).

All done with the hallway (garage door) light switch.  Waiting on a new faceplate for the one to the side of the house.


I'm approaching an all-LED home.  I made progress on two difficult lights today when I had a burst of energy.  The first (smaller) one was not that hard, it just required another trip downstairs to get a large board to place the light on its side to do the exchange.  The larger light proved much more troubling, though with a ladder, a thick book and long arms, I was able to get it done.  I hope to never have to replace any of these lights through the remainder of my ownership in this house.

Undergoing light bulb replacement surgery on the back staircase light

It is bright and all bulbs are functioning

The thick book has already been removed, but this was the proof shot that all of the bulbs were replaced and they are pretty bright (eight of them)


I have a few areas still left to conquer:
  • Six lights in the kitchen are still incandescent due to the LED bulbs of the same number are too long and won't fit.  I would like to use this light fixture much more than we do and if we had LEDs, I would be inclined to do so.
  • Bookselves don't have LEDs - I couldn't find the right size when I looked for them.  They are also almost never used.
  • Some random bathroom lights upstairs.  I should just get these done.
  • Small lights in the ceiling of the bar downstairs.
  • Lights in the movie theater.  I could have replaced more, but the dimmers won't work with them and they are almost never on.
  • Landscape lighting.  I will undergo this crusade once the weather is reasonably warm and I can be out there identifying both the lights and suitable LED replacements

Sunday, April 5, 2020

Phone to Gigabit Ethernet Conversion

I've been using the desk in the sunroom of our house as my workstation during the Great Hunkering of 2020 (for COVID-19).  It is arguably the nicest and most convenient work area for me.  Unfortunately, my Mac Mini frequently drops the wifi signal, despite my Macbook Pro keeping it without issues.  Perhaps it is the bottom mounting of the Mac Mini that is causing the problems.  Whatever it is, I was in search of a solution.

Today I decided to do something about it.  My initial thought (prior to today) was that I was going to have to drill a hole in the outside wall and run a cable.  I'm sure it would have worked.  However, this morning I decided that I should look to see if there was anything already behind the big wall desk / bookshelf unit that we have.

My workstation during the global pandemic

I did some craning of the neck and smooshing of my head against the wall to see what was up.  Ultimately, I also pulled out my boroscope, but that didn't help my view so much.  What I concluded was that I had both a power outlet and most likely a cable outlet, but that it was behind the rightmost section of the unit.  My expectation was that I would have to buy a pair of Mocha boxes to get the location on the network, but after I did, I would have high-speed connectivity.  After some examination, it looked reasonably simple (six bolts) to remove the unit from the middle piece.  I thought it would be worth doing, so I brought it up with Esther.

Esther was skeptical.  Mostly, I think, she was worried that I would mess up the bookshelf unit and cause unintentional problems.  I assured her that I would go slowly and carefully.  Then I got to work.

The first five bolts came out easily.  I verified that they could be re-inserted easily, too.  The last bolt, of course, was not easy.  Somebody had mostly stripped the hex insert when installing it in the first place.  One size larger Torx head, and I was able to carefully remove it.  Some careful sliding and I was able to see what was up.  It turned out to be a phone outlet.

Bookshelf unit detached and moved enough for me to sneak behind it.  If you look closely, you can see the phone line faceplate removed.

A mess of wires going into the general direction of my desk.  I'm not going to figure out which one is the right one just by noting where they are routed.

My first thought was: bummer, but perhaps I could use the four wires of the phone line to get 100 Mbps ethernet.  So I headed down to the telephone patch panel.  Here's where my luck got good: when the house was built in 2007, they used Cat 5e cables for all of the phone lines.  If my luck held, I should be able to get gigabit ethernet at my desk, not just 100 Mbps.  But, there were a few more steps between point A and point B.

Patch panel in the basement.  Those blue wires are all Cat 5e.  The one headed down to the right (with the grey strain relief cap) is the one heading to my desk.


It took some doing, but after I disconnect all of the phone lines from the patch panel and used my network cable tester (after fully separating the wires), I was able to with pretty high confidence find which wire went to the desk.  Excellent!  I terminated the correct wire and luckily found a straight-through ethernet connector.  I put a short ethernet cable from there and made it to the 1 Gbps switch a few feet away.  Then it was back upstairs to finish the job.

I went through all of my old Lcom gear to find appropriate parts.  I didn't have quite what I thought I needed, but I made it work.  I had a two keyhole faceplace and a blank.  Given the lack of clearance on the wall (due to the bookshelf fitting snuggly against it), I couldn't feed a cable out how one normally would.  So my plan was to get as much of the cable out and then connect.  Sadly, I didn't have another straight-through ethernet connector.  So I rummaged through my bag and found the next best thing.

Eight little connectors added and wall plate secured.

Eight little connectors later, and some mild amount of frustration, I had my connection made.  I then terminated the other end of the ethernet cable and gave it a go in my Mac Mini.  No go.  Sad.  Time to get the cable tester again.  It didn't take too long to figure out that I had poorly terminated the end of the cable that was to go into my Mac Mini.  Frustrating, but I re-terminated the cable and the second time was a charm.  I had System Preferences | Network already open, so I could see the ethernet go from red to green.  I had liftoff.

The final step was to see whether it was just 100 Mbps or 1 Gbps.  For this, I cheated and used Fast.com and got ~ 860 Mbps.  This is clearly a limitation of my FiOS connection, not my desktop link.

Then, everything when back together slowly and carefully: I must have partially screwed in the bolts about 50 times to make sure that no section was overly stressed.  I reshelved the unit and placed all the books back on. 

Monday, May 27, 2019

Cox - for the Gigablast loss!!

Wow - Cox just doesn't apparently know how to run a network.  Or customer service.

I've just moved from my old house with Gigabit Fios.  I decided, despite the paltry upload speeds, to get gigabit at my new place.  I was disappointed when I found out that the neighborhood I was moving into, despite it being denser, did not have FiOS.

Several calls to customer service later, multiple resets, and it just starts working.  The only information that I can find about it is that there are issues with MAC address binding.  But of course, not information provided by Cox, just a forum on Reddit.  Super frustrating.  But glad that we have rain in what was our Internet desert.

Friday, April 5, 2019

Dinosaurs!

Not my typical post, just a reminder to my future self that I've recently read the powerful New Yorker article about the day the dinosaurs died.  It is definitely worth a read if you haven't done so already.  The conclusions drawn about the globally catastrophic event are incredible but seemingly well-founded.  Amazing stuff.