I can't help but pass along a link I saw today about a fantastic idea (not totally serious) to hook up a tube to ones stomach to immediately remove some of that high calorie food that one has ingested. The article was linked from Marginal Revolution (one of my favorite blogs to follow). The link is here. As the brief article describes, there are some complications with its use. In addition to a massive ick factor. That said, it seems to be much better than forcing oneself to throw up (my least favorite biological activity of all time). I guess you get to enjoy all the benefits of the tasty food and indulgence without any of the negative consequences.
It is similar, but perhaps more direct, than an idea that I've been espousing for the last few years: a device that one would hook up at night that would filter or otherwise remove excess fat or sugars in ones blood (similar to a plasma machine, but presumably, much simpler/costly). If human fat were of any economic value, this idea would be money.
Or as it turns out, there is some value in people not being ridiculously obese. Maybe some day under our new "affordable care" regime, people above a certain BMI will be forced to wear one of these devices.
Sunday, January 6, 2013
Saturday, December 22, 2012
What to track?
In The Island, each of the clones are cared for and tracked extensively by computer systems to ensure their healthy existence and usefulness as source material for the human that was cloned. Though a disturbing premise, it does make me think about what we could do for ourselves now to better track our fitness and daily health. Some things exist now - others, not so much. Here's what I think the world needs:
- Pulse Rate and Blood Pressure monitoring: this is an oldie but goodie. Trouble with this is doing it consistently when its a separate activity. Not likely to happen. [Added: As Scott pointed out, Respiratory Rate should also be part of a complete picture here. Unfortunately, there are no current tools that I know of to capture this - pulse is apparently an easier "on the go" measurement to take. I'd rather not wear a face mask when riding.]
- Disolved Oxygen Levels: I just bought a handy finger tip device to measure this (along with pulse). Great little device, but not connected to anything.
- Urine Monitor: I haven't thought too much about this one, but it seems like a relatively easy thing to monitor. Hang a device off the side of your toilet and it should be able to read some measure of the chemistry in the bowl before and after your deposit. Somewhat gross, but I think that the results would be fascinating and useful. Would have to have a means of distinguishing the depositor and transmitting the results.
- Motion and Skin Moistness Monitor: I that this has been done (a la fitbit - for the motion part, which appears to be way better than Philips DirectLife; but Body Media Fit Link), but perhaps beyond acceleration and skin moisture content. Add to it the following: temperature, blood pressure, oxygen and pulse levels could be recorded (all of the time)? It would be great to be able to see how your body's metrics change as you: start your day, eat lunch, meet with stressful clients, start your workout, sleep. Also, it would seem to be useful to provide alarms or silent vibrations when you've been sedentary for too long (like now while I try to collect my thoughts for this post). This would be fantastic for an office worker such as myself. I think form factor and ease of use will be the key here.
- Weight: obvious one, I think. Data preservation should take into account time of day, though.
- Body fat measurement: handheld device to measure directly the fat in your body (or at least inferred through electrical resistance). Likely related, but not perfectly, to weight. The fitbit wi-fi scale looks like it does a good integrating this and weight (and makes it easy to track).
- Waistline/neck/thigh: simple measurement, maybe, but I think that there should be more consistency - there must be a way to do it the same every time? Digital measuring tapes and calipers could also be solutions here.
- Sleep Monitoring: part of what the fitbit offers, but I'm not sure how much useful information it provides. Should take some user input on when you've first laid down (though maybe this is obvious from the motion, or lack thereof).
- Food Intake Monitoring: Aside from forcing people to record what they eat, I'm not sure what to do here. I've done this over a couple of month period and it turns out to be reasonably hard to keep up with. Need to find a way to make it easier. How about taking a picture of what you are eating and the software figures out what you are eating and estimates how much of each thing? Probably stupidly complex to make work well, but would be pretty sweet.
Design Principals:
- Data preservation: all measurements are kept and timestamped
- Data connectivity: all devices instantly pass along their measurements to a data preservation capable device (and ultimately send the data to the cloud).
- Data ownership: all data should be available in a way that the user can easily manipulate on their own (CSV is probably the least common denominator).
- Personalization of data presentation: different people are going to care about different things. Let them customize the view. That said . . .
- Give guidance on what matters: Make sure that people know what types of things that they should be looking at. Why does it matter? What studies support the view? How can they make small changes in their behavior to improve their health / outcomes?
- Encourage the user to meet goals: goals should be chosen by the user and encouragement tailored to their interests - text message alerts/reminders/pick-me-ups and email summaries of progress would be fantastic approaches (and have already proven effective in studies on quitting smoking). fitbit badges, etc. seem to be an OK start - but not quite the same.
Saturday, December 15, 2012
A New Bulb
The only lightbulb on the outside of the house that was not an LED was the CFL that was lighting the stone chimney that is on the front of the house. It was a CFL because I didn't have any LED's that fit in the light fixture. Well, that bulb is dead. I'm not sure that I should be surprised, but it was annoying giving that it is the only bulb on the outside of the house that requires the aluminum extension ladder to get to. Fortunately, I combined changing this bulb with hanging the icicle lights, so it wasn't too much extra effort. Let's hope that this bulb lasts for its rated lifetime of 30,000 hours! (that would be roughly 8 years)


Saturday, December 8, 2012
Is that a speaker or a light?
I saw the IAV Light Speaker yesterday in an email from SmartHome. Pretty cool concept: a virtually hassle-free installation for wireless speakers. I haven't seen any reviews to know if they are worth anything (but would be willing to test them out for the manufacturer if they asked). Immediately, though, here are some problems (IMHO) with their approach:
- They are wireless, but the website doesn't have any information about the wireless technology (or even band) that is used. There is some information on this HomeToys press release-like article. But that is just enough to be concerned about wifi interference.
- Its not clear that the speaker and the LED components are modular. What if one dies and the other still works? This seems like a problem.
- High price - seriously, $200/speaker of unknown sound quality? $800 just to get started. Nope. No matter what you save in installation, this will be too high a barrier to most. Get it down to $100 for the base station and $100/speaker and I think you have something.
- No digital audio in option. It seems that this would have been easier (and a path of lower sound quality degradation) than their approach. So it goes from Analog at base station input toDigital for wireless transmission (presumably?) to Analog to be played by the speaker. Why not skip the first A/D conversion?
Monday, November 5, 2012
The New Hue: Review of the Philips Hue
A friend recently shot me a quick email asking if I was planning on getting the Philips Hue, noting that it was currently for sale at the Apple Store. I had never heard of it, so I had no immediate answer. It didn't take long to convince me; after checking out the product for a couple of minutes, I placed my order and then went off to Mexico for a planned vacation.
This was very much of the same concept that I had laid out in a blog post four years ago. I was pretty excited to see the product in a commercial form. The Hue arrived yesterday, right after I got back from my trip; I had to open it right away (while eating dinner). Check out this (much more complete) review on Geek.com if you are interested in an alternative perspective.

Super easy setup, especially for how I was planning on using it. My plan was to put the three lightbulbs in the overhead light above our couch. One idea was that it could dim to red while watching a movie to provide a bit of light ("movie mode"), but not be disturbing our eyes to watch the movie (our son constantly complains if we have the lights on during a movie or TV show). This light is not far from my main 24-port ethernet switch (which still has roughly half its ports available). I followed the instructions on the box:
 Getting the lights in to movie mode took some tinkering with the app. Finally, I ended up using the feature to set the color to that of a portion of a picture (forcing me to find a picture in my photo library with a nice solid red). This worked except for the bulbs were a bit bright. After more messing around, I was able to control the bulbs from the brightness / tone configuration screen. There was no solid confirmation that my changes had been saved, but apparently when any change is made, it is kept.
This was very much of the same concept that I had laid out in a blog post four years ago. I was pretty excited to see the product in a commercial form. The Hue arrived yesterday, right after I got back from my trip; I had to open it right away (while eating dinner). Check out this (much more complete) review on Geek.com if you are interested in an alternative perspective.
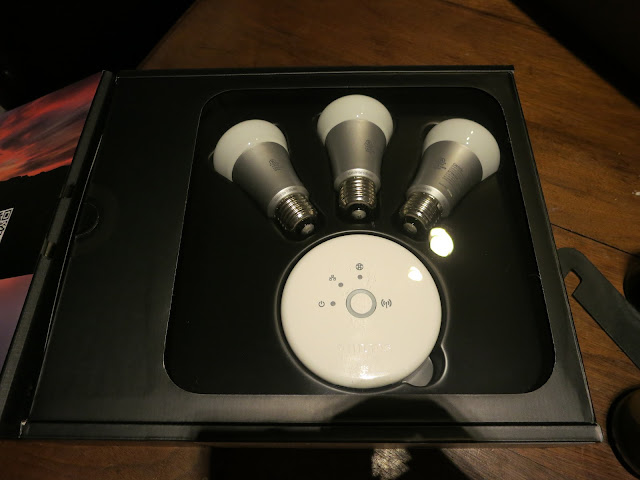
In the box

- 3 "connected" lightbulbs
- Zigbee hub
- Power adapter for zigbee hub
- Ethernet cable
Out of the box

Super easy setup, especially for how I was planning on using it. My plan was to put the three lightbulbs in the overhead light above our couch. One idea was that it could dim to red while watching a movie to provide a bit of light ("movie mode"), but not be disturbing our eyes to watch the movie (our son constantly complains if we have the lights on during a movie or TV show). This light is not far from my main 24-port ethernet switch (which still has roughly half its ports available). I followed the instructions on the box:
- Screwed the lightbulbs in
- Turned the lightbulbs on
- Plugged in the zigbee hub (both ethernet and power)
- Downloaded the free Hue app for my iPhone
- Fired up Hue and began to play around
First Impressions
When I turned the light switch on, the bulbs lit up. So far so good. After connecting the Zigbee hub and loading the Hue app, the app directed me to push the button on the hub. I didn't get a great "click" sensation from doing so, but soon the app was off and running finding the light bulbs. I was then given a series of lighting "scenes" that I could adjust the lights to. It was pretty cool to mess around with them and they all seemed like their names suggested.Movie Mode

Turning the lights off
When I was done watching MNF, I turned off the lights and left the room. But at the back of my mind, I was wondering what would happen the next time the lights were turned on. Fortunately, what I consider the "right thing" happened: they turned on to be normal white light bulbs. I like the flexibility that they will do funky stuff when you direct them to, but otherwise will just be normal lightbulbs. You don't need to always use your iPhone just to turn on the lights (that would be supremely annoying).Brief Comment on the Technology
The bulbs communicate to the hub via Zigbee. Zigbee is based on a mesh network concept that should mean that every additional bulb expands the reach of the network. Unfortunately from what I've read, Zigbee implementations tend to be proprietary and thus you won't be able to control this from a MiCasa Verde Vera or other home controller without a special extension package. [Aside: this could be simpler than I'm suggesting depending on whether the Philips Zigbee hub has a nice API to interface with it. I would have signed up to be a developer to know more, but apparently they are still "developing for developers"] The Zigbee hub connects via wired ethernet (potentially a problem for your setup) to the rest of your home network (including your WiFi). Your phone connects via 802.11whatever to your WiFi router. My setup certainly does not test the bounds of possibilities here - the Zigbee hub was placed within 10 feet from the light fixture. Thus, I don't have anything useful to say about practical distance limitations for this setup.One Step Beyond
First, some thoughts on my setup and then some criticisms. I have three bulbs in an overhead fixture. To the left and right of the TV there are four recessed lights for PAR 20s (two on each side) that the Philips Hue bulbs will fit in. At some point, I will spring to replace all of them to complete the room mood. Unfortunately, at the current price point, its going to be hard for me to do this. It would cost $60 x 4 = $240 just to finalize this. Ouch. For now, the Phillips Hue is just a fun toy. Someday, maybe more than that.Improvements
It looks like Philips is towing the Open Source line for the moment. They are looking for developers to extend the Hue setup. Hopefully, the developers will add these capabilities soon:- Party Mode: Dance to the music. Seriously would have made for some cool commercials. Not sure what they were thinking by leaving it out. That said, how complex would this be? Could AirFoil/AirPlay be used (using an iPhone as a receiving speaker with an App running to convert the music to light pulses)?
- Grouping of bulbs: Perhaps there are a few interface features that I'm not aware of, but it seems like it'd be difficult to have too many bulbs distributed through
- Power meter: should be a trivial addition for the app to tell you instantaneously how much power the light bulb(s) is(are) using based on the current light settings.
- Room mapping (real scenes) and programming: It would be cool to be able to create more complex scenes that would be based on both interaction of paint color and a transitioning scene. Simple ideas would be to have a strobe effect (I have three bulbs in a circle on the overhead light) or a wave washing across a room (from left to right) or circling the room. Fancier still might be to have light patterns that could mess with your mind. I can see some OK Go!-like videos in the future here.
- Web-based (remote) control (oops - looks like this already exists - should have poked around the Philips Hue website a bit more.
- Different bulb shapes (this is supposedly in the works).
Sunday, August 12, 2012
Automation of a Garage Door
I was inspired by this video that I saw on YouTube a while back to both automate my garage door opener and to also install a position sensor. I finally got off my butt today to get the project done. All of the purchases had been previously made, and I was pretty sure that I had the appropriate tools.
Equipment List:
- Already installed garage door opener
- Radio Shack Relay (125VAC/10A DPDT Plug-In Relay)
- Radio Shack Quick Crimp-On Disconnects (found here)
- GE 45604 Z-Wave Technology Outdoor Module for Lighting Control (at Amazon)
- Two prong extension chord (to be sacrificed).
Process:
- Wire up the relay to the extension cord providing power to the relay. Specifically, cutting off the extension cord and then using the end with the prongs. I've never wired up a relay - so this was a first to me. I used simple wire strippers and cut the wires such that they would fit into the quick disconnects. I crimped them using my wire strippers.
- Wire up the relay to a blank section of the extension cord (just using some of the wire). Added crimps on the end to be connected to the relay and left the end to be wired to the door opener stripped but bare wire.
- Here's what it should look like when all done:

- Add the Z-wave Outdoor Module to my MiCasa Verde. I did this by plugging it in near the Vera, turning it on and having it add it. I referred to it as Garage Door Opener.
- Take everything to the garage and plug it all in. This involves wiring the stripped end of the extension cord to the same wiring terminal as the existing switch and remote control. This is what it looked like for me when it was all done. Note that the Z-wave switch and the relay were just sitting on top of the garage door opener (hopefully things don't move around enough to warrant zip ties).

- Add a scene to MiCasa Verde called "Garage Door" to turn on the switch and then turn it off in 5 seconds (the shortest amount of time possible).

Note: The wiring of the relay should be pretty straightforward. The one I had, there was a simple wiring diagram on the back of it showing the state of the relay when it was open (off).
[Update 2013-12-16]
To add a little bit of clarity to exactly what I am doing with the relay here are some additional pictures and some explanation:


[End Update]
[Update 2013-12-16]
To add a little bit of clarity to exactly what I am doing with the relay here are some additional pictures and some explanation:
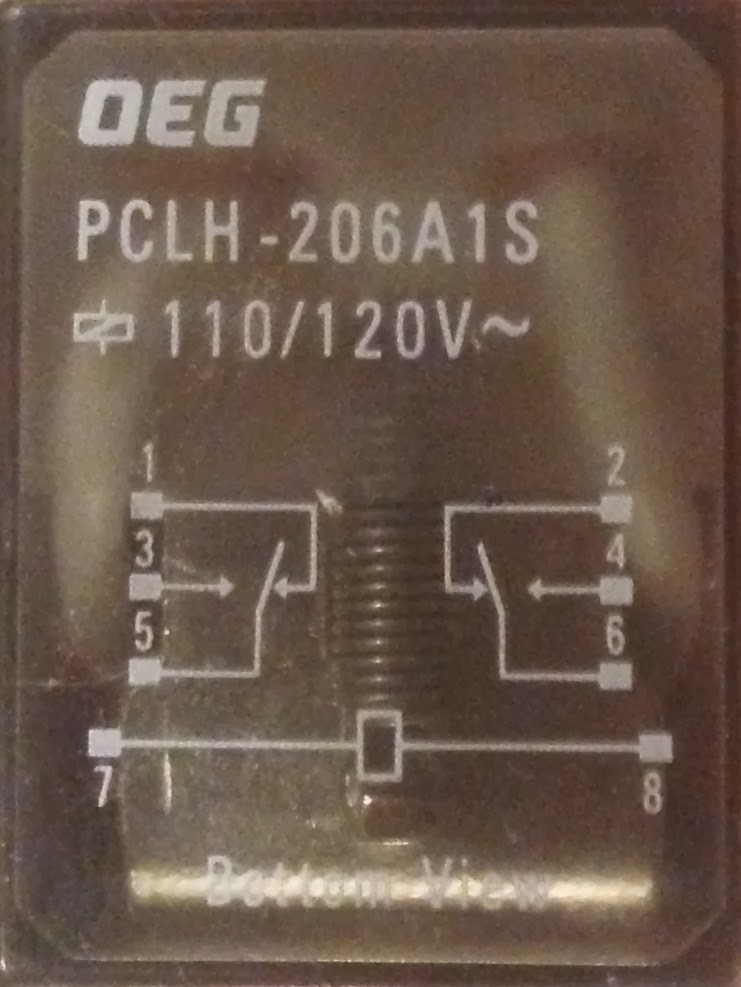
My relay was set up like this; the diagram depicts the configuration of the pins when the power is off. When power is switched on, the link between 2 and 6 or 1 and 5 flips to 4 and 6 or 3 and 5. This is essential to trigger the garage door, which needs a circuit to close for a brief moment (that is what your normal garage door switch is doing).

A little bit hard to tell here, but the power outlet from the Z-wave controller (the two white wires with the blue warning label around it) are plugged into the 7 and 8 poles. The garage door opener is connected to poles 4 & 6 (normally open to one another, but when the relay is active, closed).

Another view from the business side of the relay; here you can see the numbers clearly on the left side of the relay (not used).
After it is installed, you may want to ensure that your previous means of raising and lowering the garage door still work (remotes, hard-wired All set. Assuming the relay is wired correctly, when the scene is run you are good to go.
Bonus Round
I also and almost primarily wanted to know whether the garage door was up or down. To do that, I needed an window or door sensor. I chose an EverSpring Z-Wave Door / Window Sensor. Prior to going to the garage, I added the sensor to the MiCasa Verde.
It turned out to be pretty easy to physically install, the key was finding a spot where I could keep the gap between the sensor to a minimum (less than 40mm) that was added to the door and the portion screwed in to the garage door frame. For me, this required adding a door shim behind the sensor to make sure it was close enough to the magnet in the traveling sensor. After final installation, it looks like the following:

After a few test runs making sure that there was no interference and that the MiCasa Verde was reading the position properly, I declared victory. Victory may be premature - my guess is that this setup may have issues in the cold - there is an air gap at the top of the garage door that might hamper the batteries in the sensor. We'll have to wait and see if that is the case, though. A 4.5V DC power supply could be brought to bear if need be.
Finally, I see the following in the room "Garage Door":

It turned out to be pretty easy to physically install, the key was finding a spot where I could keep the gap between the sensor to a minimum (less than 40mm) that was added to the door and the portion screwed in to the garage door frame. For me, this required adding a door shim behind the sensor to make sure it was close enough to the magnet in the traveling sensor. After final installation, it looks like the following:
After a few test runs making sure that there was no interference and that the MiCasa Verde was reading the position properly, I declared victory. Victory may be premature - my guess is that this setup may have issues in the cold - there is an air gap at the top of the garage door that might hamper the batteries in the sensor. We'll have to wait and see if that is the case, though. A 4.5V DC power supply could be brought to bear if need be.
Finally, I see the following in the room "Garage Door":

Monday, May 28, 2012
Spectrum wants to be Free!
In the winter of 2000, I came down to Fairfax to do an "externship" at AMS during what MIT calls its Independent Activities Period (or IAP for short). While I was there, I ran into a guy who wrote a paper in his undergraduate time at MIT about sharing spectrum - ultimately arguing that nothing should be licensed and we'd be much better off with freeing spectrum. Then, yesterday, I ran across this article in the NY Times that is essentially talking about doing something similar, but in a much orderly fashion, involving registration, but sharing a lot of government spectrum. If this all pans out - it would free up an amazing amount of spectrum and free up a lot of data bandwidth.
Saturday, May 26, 2012
Simplest technology the best?
I went on a 20 mile bike ride today, but didn't bring any water with me. Great ride, but I was pretty thirsty when it was over. No worries, there was a McDonalds on my way home. I went in, bought a large soda and got a cup for water. That is when the problems started.
First, the water dispenser wasn't working. Then, the Diet Coke that came out of was so thick with syrup that it was kinda gross. And I had so been looking forward to the drink. Why, I immediately wondered, couldn't I mix the amount of syrup that I wanted?
If you've been to Elevation Burger or BGR recently, you've seen some fancy touch screen soda dispensers. They are fancy and have endless selection. Diet Coke with some orage splashed in, no problem! Anything. But getting the mix of soda water to syrup down requires you to navigate several menu screens to get to just soda water. It does the trick.
But not really as well as the old school machines that on the Sprite have a simple lever (akin to the water lever that typically sits next to the lemonade dispenser) that says Soda and as the name suggests, just dispenses soda. What a simple and wonderful solution to the problem. Infinite choice in a very simple package.
Sunday, March 11, 2012
Outdoor Lighting Quest
This probably should have been something that I did the first week we moved in here, but I have finally gotten to the point that every outdoor light works and is functioning. Here is the finished product:

The front (from a vantage point around the middle of the front yard)

The back
We have heard that lighting is one of the keys for good home security - more important than a fancy system. This was told to us by somebody who sells these systems for a living (and owns his own company). I finally decided I should make this happen.
The road to get there was not trivial and involved learning that we had more lights than we thought. Specifically, we didn't realize until recently that the main outdoor light fixtures had elements pointing in the upward direction. Makes sense given how tall the light fixtures are, but we just didn't know. Also, we didn't know that there was a light facing downward on the chimney. All news to us.
Now for some LED fun. If we lit all of the lights in the front of the house with incandescent bulbs, we'd be burning close to a full kilowatt - or 910 watts. This assumes that each of the fixtures would have a 65 watt bulb, which is reasonable for the PAR 38s. So if we were to leave the lights on an average of 10 hours a night, it would cost us $365.37 per year to light up the front of the house at a rate of $0.11/kWh (roughly our current rate). With the LEDs (and one CFL, cause the LED wouldn't fit in that space), we are burning only 243.5 watts. As a result, we will be saving $267.60 per year on electricity costs. However, the bulbs do cost more.
A cheap set of 65 watt PAR 38 lightbulbs costs $2 each. So for our 14 lightbulbs, lets assume a baseline price of $28, which would probably have to be replace every other year. I recently bought the PAR 38 LEDs at Costco for $36.99 (12 in use) and a PAR 30 for $29.99 (one in use) and the CFL (one in use - about $7). The total cost for the LED arrangement is a lot. Without going into too much more detail in words, see below:

The one aspect that the above chart ignores is the cost of changing lightbulbs. Though my labor in actual terms is free, I'd like to believe that my time has some non-zero value. The LEDs should last somewhere in the range of 7 years, while its unlikely that the incandescent bulbs will last more than two. In fact, the LED's should never burn out totally - their end of life is defined by only outputting 50% of their original brightness due to a degradation of the phosphorus, which happens due to the heat). That said, I don't know how these bulbs will perform outdoors. There will very cold days, where its not likely that the bulbs will heat appreciably at all and other summer nights where they will be hot. All that said, not having to think about these bulbs for the next seven years is probably worth another couple hundred dollars (even if only $30 per year -- that's still $210). I know that this is one of the drivers of adoption of LEDs for businesses - and I think it definitely factors into my thinking, too.
Finally, here are some pictures about the process for getting everything set up:
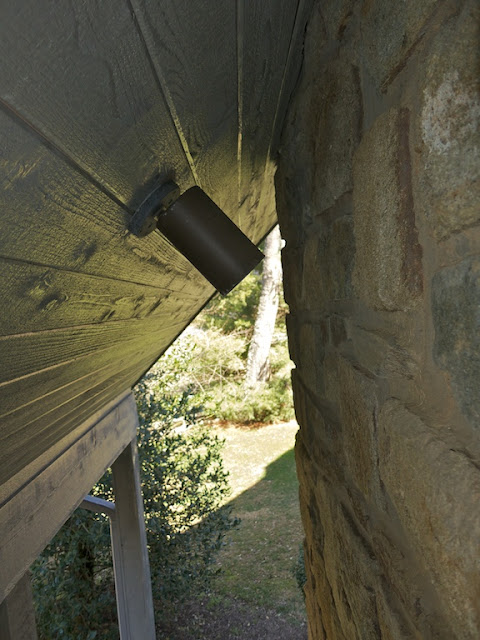
This is the "new" light

Its actually a long ways up there; this is the view from the bottom

And from the side
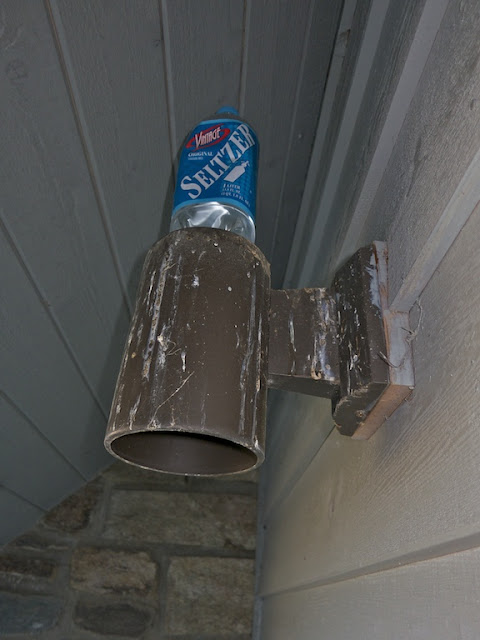
I was also replacing a bulb here - note the bottle of water placed on the top to help disuade any birds from building nests there, which is what happened last year. The birds crapped all over the porch and generally made a mess of things. Not terribly awesome - we were hoping to avoid it for the future - and are looking for a more permanent solution.
Ultimately, the front and rear house lights are going to be controlled by my Mi Casa Verde system that I purchased a while back, but have no hardware running on. As soon as I figure out just what types of switches I have (2-way versus 3-way, etc.) and which ones will work from a systems integration perspective.
The front (from a vantage point around the middle of the front yard)
The back
The road to get there was not trivial and involved learning that we had more lights than we thought. Specifically, we didn't realize until recently that the main outdoor light fixtures had elements pointing in the upward direction. Makes sense given how tall the light fixtures are, but we just didn't know. Also, we didn't know that there was a light facing downward on the chimney. All news to us.
Now for some LED fun. If we lit all of the lights in the front of the house with incandescent bulbs, we'd be burning close to a full kilowatt - or 910 watts. This assumes that each of the fixtures would have a 65 watt bulb, which is reasonable for the PAR 38s. So if we were to leave the lights on an average of 10 hours a night, it would cost us $365.37 per year to light up the front of the house at a rate of $0.11/kWh (roughly our current rate). With the LEDs (and one CFL, cause the LED wouldn't fit in that space), we are burning only 243.5 watts. As a result, we will be saving $267.60 per year on electricity costs. However, the bulbs do cost more.
A cheap set of 65 watt PAR 38 lightbulbs costs $2 each. So for our 14 lightbulbs, lets assume a baseline price of $28, which would probably have to be replace every other year. I recently bought the PAR 38 LEDs at Costco for $36.99 (12 in use) and a PAR 30 for $29.99 (one in use) and the CFL (one in use - about $7). The total cost for the LED arrangement is a lot. Without going into too much more detail in words, see below:
The one aspect that the above chart ignores is the cost of changing lightbulbs. Though my labor in actual terms is free, I'd like to believe that my time has some non-zero value. The LEDs should last somewhere in the range of 7 years, while its unlikely that the incandescent bulbs will last more than two. In fact, the LED's should never burn out totally - their end of life is defined by only outputting 50% of their original brightness due to a degradation of the phosphorus, which happens due to the heat). That said, I don't know how these bulbs will perform outdoors. There will very cold days, where its not likely that the bulbs will heat appreciably at all and other summer nights where they will be hot. All that said, not having to think about these bulbs for the next seven years is probably worth another couple hundred dollars (even if only $30 per year -- that's still $210). I know that this is one of the drivers of adoption of LEDs for businesses - and I think it definitely factors into my thinking, too.
Finally, here are some pictures about the process for getting everything set up:
This is the "new" light
Its actually a long ways up there; this is the view from the bottom
And from the side
I was also replacing a bulb here - note the bottle of water placed on the top to help disuade any birds from building nests there, which is what happened last year. The birds crapped all over the porch and generally made a mess of things. Not terribly awesome - we were hoping to avoid it for the future - and are looking for a more permanent solution.
Ultimately, the front and rear house lights are going to be controlled by my Mi Casa Verde system that I purchased a while back, but have no hardware running on. As soon as I figure out just what types of switches I have (2-way versus 3-way, etc.) and which ones will work from a systems integration perspective.
Saturday, March 10, 2012
You Ain't Got a Thing if You Ain't Got that Ping
I have been testing a Verizon Pantech 4G LTE device for work. Basically, to ensure that it delivers 3G performance as good as our current devices and a solid 4G performance when that is available. Andrew suggested that I run a speedtest.net test on it and compare it to our Cox cable internet service. The results are not that impressive . . . for Cox. Here are the comparison points:

Cox

Verizon

Cox
Verizon
You will note that the ping on the Verizon card is pretty bad and that could very negatively impact gaming performance. That said, its individual performance exceeds that of my cable internet service. Go Cox!
The one very important aspect that the above test doesn't address is the amount of bandwidth one gets for your service level. In fact, try to find it here:
Its not there for Cox. Wonderful. So what are the limits? You can chat with a live representative and get an answer:
So then, what are they for Verizon 4G LTE? If this story is correct, they are 4GB for $30/month, 10 GB for $50 and 20 GB for $80. Not awesome. Especially when a single download (Mac OSX Lion) can be 4 GB. Or an HD movie can be a couple of GB.
For now, it looks like sticking with a wireline makes the most sense, but only from a data cap perspective.
Sunday, February 26, 2012
Nesting

My motivation was pretty simple: I wanted something that was easy to program and internet accessible. In fact, the joy of a "self learning" system wasn't one of my primary motivating factors. The interface for the Nest looked good and my understanding was that it should fulfill my other wants - so I went ahead despite the reasonably high $250/unit starter cost. If I really could schedule easily, I could easily save the purchase price in a couple of years. Despite the fact that we had two programmable units in the house, I found their interfaces to pretty much be impenetrable and, for the most part left them unprogrammed.
On February 14, I got a message saying that I could order my Nest. But, "Click below to order, but please note that you can only order once using this personal reservation page." So I decided to take the plunge and ordered two - one for the upstairs systems and one for the downstairs. They shipped within two days and were here quickly - it was just a matter of me finding a few hours to install them and configure.
The installation was not difficult and the materials provided were well thought out. They even include a screw driver with interchangeable heads to allow you to easily unscrew pretty much anything that you'd encounter. There were also nice little (blue) stickers that you could use to label each of the wires positions before undoing anything; this should ensure that you don't mess anything up.
Despite all of the good documentation, there was a cryptic note about not having to jumper the Rc and the Rh (both red) lines together. It wasn't clear if I needed to attach one of them or both, if they were separate wires. I eventually concluded that there is only one red control line coming from the furnace and just connected it to the easiest place on the nest panel.
One of the more painful parts of installing the Nest is finding a part of our wall that wasn't chewed up with past thermostat installations. It would appear that they have been replaced multiple times. Strategically choosing a good position took the most amount of time in both cases (and even worse when I had to pull off the Nest upstairs after the first time due to one of the wires not being connected well).
Here are all of the install pictures:

So downstairs, I was starting with a pretty old Honeywell control unit - this was the starting point for the downstairs thermostat - not sure of the vintage

The old on the floor - with the new

Wires all labeled

Connected to the Nest mounting panel - conveniently with a built-in level

Mounted!

Mounted - upstairs!
After all of the wires were connected, you simply pop the eyeball (in Christa's words) on. It will want to connect to your wireless network, so the first step is to put in your password. After that, it updates to the most recent software level (the one downstairs did this several times before it was done - the one upstairs, just once). After that you can begin the setup; the first step is to show you which wires it thinks are connected. It does this in an incredible simple visual way, making sure that there is no question about whether its done right.

The rest of the setup to do on the machine is a breeze. The fun part comes when you sign up for a nest.com account. When you do, it recognizes the thermostat on your local network and you are good to go. From there, I took two different approaches. For the upstairs thermostat, I decided to set a schedule and for the downstairs I let the system learn our behavior to set the temperature.
The web interface for scheduling is pretty good, though not great. It does include copy and paste functionality. I don't know if its just an early quirk, but I lost the schedule the first time I put it together. The upstairs Nest had lost its connection to our wi-fi network, so that could have been a contributing factor. The primary iPhone application doesn't do much more than allow you to adjust the temperature, but that is exactly why I bought it.

What Its Missing:
- My chief complaint so far is that Nest doesn't share any data with me. I should be able to access a log of all of the events of the thermostat (turn on, turn off, all of the relevant parameters at that point in time, such as why it was turning off or on).
- The units are designed to learn about your behavior to help you save energy. But when that happens, it doesn't tell you anything about what its learned or what you have saved.
- My wife doesn't like the aesthetic. It looks like an ugly eyeball in her opinion.
Sunday, January 8, 2012
One Step Backward for Compatibility
When we were visiting with relatives over the holidays, my wife's sister broke out a photo album. The album had a bunch of pictures from when the kids were young and she lived near us. I offered to scan the pictures in and give her back a CD with the scanned pictures on it. I figured it would be an easy exercise, given that I have a fairly capable HP ScanJet 5500c.
My first challenge was finding the power supply for the scanner. I tore up my office, but I eventually found the power supply. Only 45 minutes more into it than I thought I would have to spend.
I recently updated my Mac Pro to OS X Lion. While this is overall a great thing, it turns out that HP no longer supports my scanner for Lion. I bought the scanner in 2003 (judging by when reviews were published PC Magazine's website). Does it make sense that the scanner would be completely abandoned after just eight years? The old HP software was apparently written for OS X 10.4, but hasn't been updated since. HP's website suggests in one location that you should be able use it through Apple's built-in image capture program. No dice. Further research revealed that my scanner was just not supported. In the end, I will have to say that I'm not impressed at all with HP.
In any event, the only way forward was backward. What do I mean? I'm a bit of a pack rat, and I never got rid of my G4 tower. I booted it up, downloaded the most recent (10.4-compatible) HP software and started scanning. Three pictures at a time, but it did work flawlessly.
Friday, January 6, 2012
FAT!
I decided that I would add a new set of pictures to cycle through my digital photo frame. I've taken quite a few over the last year, all processed and edited through Aperture. I flagged the very best and then exported to JPEGs that fit into a 1024 x 768 pixel space (the native resolution of the photo frame).
For some reason, though, I couldn't add any more files when I tried to add them on my mac. I got a somewhat cryptic error, telling me that there wasn't any space left on the 2 GB card. There were only about 307 files totaling 55 MB on the 2 GB card. It wasn't adding up - I figured it was a PC formatted card and my Mac wasn't playing nice with it. I had a flash of brilliance - I just needed to copy the files from Andrew's desktop computer onto the 2 GB card.
I went to Andrew's computer (running Windows 7) and tried to copy files over. I got a slightly different error message on Windows and chased it down. I found the right advice here. Turns out that my 2 GB card was formatted at FAT16. Seriously? How does a device made in 2010 get formatted with a technology hailing from 1984?
Seriously, it was formatted as FAT16, like the file format that shipped with MS-DOS. That format limits the number of files in a directory to 512. The root directory is even more limiting. After a quick reformat to the fantastically current technology of 1995 that is FAT32, the pictures copied over fine.
Monday, January 2, 2012
Does HDR matter?
My new S100 comes with an HDR mode (along with a bracketing mode). Here's the differences:

The first in all auto mode

The second with HDR scene mode
- HDR Mode: JPEG only. Camera shoots three times and then processes the images into a single JPEG. No options for adjusting the mechanics of the HDR processing, but super simple and complete solution.
- Bracketing Mode: After choosing this shooting type from within one of the manual modes (M, Av or Tv), the camera will take three pictures bracketing the exposure with +/- 0.5 to 2.0 AEB levels. This would then allow the user to post process using specialized HDR software like Photomatix.
I took a few pictures this morning of a pretty high contrast scenes. Here is the first pair of results:
The first in all auto mode
The second with HDR scene mode
I think that the obvious place where HDR mode excels is the tree branches. They are severely washed out in the auto mode picture. While this can be partially corrected after the face by tuning the highlights down, you will end up with an unnatural green tint around those branches. HDR mode wins!
Here is another comparison, which involves more work using the bracketing function and HDR software:
Another Reason to Love Amazon
I'm a big fan of the notion that we should be in control of our own data and vendors that make our data more readily accessible to their customers will have a competitive advantage. Although this is probably conventional wisdom in the B2B or commercial space, I don't think that its well enough recognized in the consumer space.
On Amazon's site, you can choose: Your Account > Your Orders > Order History Reports and download a pretty complete summary of activity on your account in csv format. We are very satisfied Prime members and feel like we use Amazon a lot. We ordered 108 items on Amazon last year, making our per unit cost of prime less than $1. Some were food related (on subscriptions) but many were books and electronics. A great deal for us.
Some quick thoughts on extensions:
- Grocery Store: How cool would it be for you to be able to download an entire year's worth of food purchases. You know that they are collecting this information about you for their convenience. Why not make it available to you for your convenience? Layer some analytics on top of it. Sure, it will be an incomplete list of things you purchased, but it would also give you incentive to only shop at one chain, to ensure all of your purchases are saved in one place, making the analytics all that much more powerful.
- Drug Stores: Big missed opportunity here. CVS and Walgreens should be providing a means for people to print out receipts for all HSA/FSA eligible items that they've purchased over the previous year. This would be perfect for people like me who are not very careful to save their receipts, but then want to file all at once. Generate a PDF and you are good to go and submit.
- Home Improvement Stores: Another big opportunity missed: when selling a house, you can write off the gains, all of the money that you've put into the house. Why not let people track what they've spent on improvement projects (over long periods of time) with purchase order trackers for the individuals. This would allow them to separate out capital improvements from the purchase of lawn fertilizer, which is obviously not allowed.
- Discount Stores: Why doesn't Wal-mart or Target allow us to see how much we've saved by shopping there (relative to our store of choice)? This seems like an obvious way for them to reinforce how "everyday low prices" they really are.
I really can't think of good reasons for these types of retailers to not do this. Are they afraid that customers will suddenly notice that they've spent a lot of money on a particular category of items? Or is there just a profound lack of creativity on the part of companies with respect to the usefulness of customer data to customers?
Thoughts on an S100
I bought a Canon S100 for myself for Christmas. I've been working my way through the user's manual (over 250 pages) for a few nights while watching TV. Its been reasonably slow going as a result. I will be posting individual posts about features (and example pictures), but I also wanted to post some overall thoughts here:
- Lots of features: this camera can do a lot. The user guide is a bit long-winded with lots of pretty pictures and icons to illustrate, but this camera can do a lot.
- Why does pre-programmed have to equal JPEG? Argh!!!! Why does Canon limit me from saving to RAW when I use the scene or auto mode? I find this to be a deal-killer for using these modes. Many of the modes can be better done in post-processing (like color enhancement or blurring for a miniature effect), but some, like shooting in snow, would be great to shoot RAW instead of JPEG. It would make me much more comfortable, too. I would trust the special scene modes that much more, knowing that I had more flexibility to fix any potential problems after the fact.
- Reviewers are not joking about the short battery life: It doesn't last too long. Get a backup. Amazon has one (a Canon NB-5L) for only $35.
- I like GPS tagging as much as I thought I would: Its super sweet when it works. Just don't expect indoor shots to have a tag. The satellite icon lets you know where you stand. It does take a few minutes to find a signal, but once it indicates that the signal has been obtained, it will tag your photos.
Wednesday, November 30, 2011
LEDs in the WSJ
Though I may not pay for maintenance costs at my house in terms of dollars, the same calculus described in this article in the WSJ holds for me too. I don't want to replace bulbs 20 feet up in recessed lights in my ceiling.
Sunday, November 28, 2010
The Move to Aperture
I recently upgraded from iPhoto to Aperture. Overall, I'm glad I did, though this assessment may be a bit premature. I'm a reasonably experienced iPhoto users, so hopefully my experience could be instructive for others out there.
Here are my initial thoughts on Aperture:
Here are my initial thoughts on Aperture:
- Import Process: Setting up the process to import is easy and I particularly liked how the process did not take up all available resources. That is to say, after Aperture identified all of the events from iPhoto to import, it went about the import in an event by event fashion. As soon as an event was imported, you could go to work on it.
- Faces Import Data Integrity:Faces information came in well. All of the people that I had tagged were there with all of their associated pictures. Note that this included 100's of photos for some of the kids, so it would have been a real hassle if it had not worked well.
- Places Import Data Integrity:Apparent failure at first. None of the geotagging information seemed to be imported. None whatsoever. That is say that when I went to the map, there were no pins on it. At first, there are only two things that mitigate this failure: ex post geotagging is easily done with multiple photos and you can import a GPS track log and pictures to geotag. This will remove the extra step of using GPSPhotoLinker for doing this with iPhoto. After messing around some more, and unsure if I was just looking at things incorrectly previously, it appears that my tagging information is still there. Excellent. I'm looking forward to tagging a larger percentage of newly imported pictures and will also work to tag some old stuff due to the easier process.
- Image Adjustments: Brushes One of the items that I thought was particularly interesting about Aperature was the ability to brush in our out an image adjustment. This has already come in very handy for some post-processing of an image that needed the lowlights brought up, but had some blacks in it that I wanted preserved. Not a problem, just brush out the adjustment on those areas.
- Keyboard Shortcuts: There are a lot of them, which is very appealing to me. I've already downloaded a cheat sheet and have put next to my monitor. I hope to learn them over time.
- Interface: I will have to say that I have done much more stray clicking around in Aperture than I have ever done in iPhoto. The interface looks like its going to take some getting used to. That said, I'm not worried that it will never make sense. I think it will just take some getting use to.
- More to come . . . .
All I want for Christmas
There are few things in the electronics realm that I find overly compelling from a Christmas present receiving sort of perspective. That is to say, there isn't much I want for Christmas. Part of the problem as I have gotten older is that my interests shift to larger and larger dollar purchases. In no particular order, here are the few things that I do sort of want:
- 30" Dell Monitor: I've been wanting to replace my two 20" Dell monitors on my desktop for some time. My hope was always that the 30" monitors would be well below $1000 by now. Alas, they are not and I can't get myself to take the plunge yet. I'll have to look for refurbished and sales items from Dell.
- A Sports Watch: Thinking something cheap or on the order of $35 and from Nike or some other such sport brand. Doesn't need to do anything but tell the time, just like they did 100 years ago, but digital, waterproof, sleek and durable would be nice.
- Home Automation Gear: This is still on my list of things to do, but hardly seems like a Christmas present. Maybe there are some starter packages that work well. I've been advised by a friend who runs a home automation company that Control4 is a much better purchase than Insteon or X10. Therefore, I'm a little hesitant to buy any other as a result. I also think that I would find it useful to have the security system (that we haven't decided on buying yet) tied into the home automation system.
- A New, Higher Quality Pocket Cam: I have a range of cameras available to me right now: a Canon 5D Mark II (high quality, but crazy bulky), a Canon Digital Rebel XT (still high quality in most cases, but still bulky), an Olympus Stylus 1030 SW (pocketable, waterproof, and virtually indestructible but optics and picture quality are mediocre). I have researched a bit and found two good candidates, but neither is sufficiently compelling to take the plunge. The first, the Canon S95, inspired this post from David Pogue from the NY Times. The S95 has a large sensor and great features to take great pictures. It does, however, still lack GPS tagging, one of the key features that I find compelling about the Panasonic Lumix DMZ-DS7. It not only has some good optical properties, including a 12x zoom, but it also has the GPS tagging.
- Vehicle Port Logging: I ran across the concept in Popular Science (or Mechanics, not sure which) and am very much intrigued. There are at least two options: the Rev and the (less excitingly named) GL1. Both of these products combine information from your phone's GPS data stream with data from your vehicle's OBD-II data port output. That second stream of information will allow you to track instantaneous fuel consumption, engine revving, service codes, etc. I think that there would be a bit I could learn about how I drive and when I do or do not waste gas. Of course, in the end, I would want to be able to keep the data in my own database, just not sure that part is going to happen. UPDATE: After reading this review, I've decided that the GoPoint GL1 has a ways to go before I want to invest my time and effort into it. The software may have improved since the April review, but the fuel efficiency calculations were horrendous -- enough so as to mislead. I will wait for some maturity here.
Thursday, December 31, 2009
FIOS: Not yet
I have recently been motivated to pay less for my TV & internet service. This was really driven by the fact that my monthly bill for TV & internet from Cox is $132 and change (roughly $10 of that in taxes).
I would think that FIOS would be a good alternative. They are the upstart, working hard to gain market share and so on, right? Apparently not. I'm not sure why, but they are not willing to provide me a bundle that is a lower price than Cox. In face, when I price it out, the price is exactly the same. Here's the scoop:
FIOS:
The key problem here is that you need to pay monthly for a set top receiver for every TV that you use. This is problematic when you have up to six TVs that you'd want to be able to get service. The following assumes that we only hook up three TVs: HD on the big TV and the master bedroom and SD TV on one other. This adds $26/month to the cost of the service. Outrageous - especially since Cox doesn't require a box for any connection. And, we can get HD on our TVs without any box (so, its not just SD TVs that this works for).
Sadly, this setup doesn't even include a DVR (which we currently have with Cox). Note that I haven't done a channel-by-channel review to see what service has what. Both include the core channels that I care about: the networks, ESPN, USA and SyFy. I don't really think that there are too many others.
FIOS requires a year-long commitment and will guarantee your price for two years. So the bottom line price (before taxes) is $120 per month.
Here's a picture of how Verizon separates out the various charges:
Cox:
Cox's bill is broken out like the following:
It is worth noting that the Cox bill is before the $12/month discount that Cox extended to me for agreeing to a year-long term (the same terms that Verizon is seeking).
Conclusion:
Its always easier to do nothing (i.e., not change service) and I think that's what I'll be doing. A potentially, slightly faster internet connection is not sufficiently interesting to mess with the switchover.
The $150 incentive that Verizon is throwing out there to switch is not sufficient to cover my switching costs, which I consider to be the following:
- Overlapping service: I won't switch off my current internet service until I'm convinced that my new service is working reliably and the way that I want.
- Tearing up of my "lawn". OK, so it may not be the greenest and densest lawn in all of Northern Virginia, but I still don't want to have to deal with the installation.
- Uncertainty: I may have missed something in my analysis. The FIOS service could be lacking in a way that I'm not comfortable with.
- Flexibility with TVs: with FIOS I have to pay extra for every single additional TV that I might want to have hooked up. Not something I'm OK with doing, even though I don't have plans to do so and despite the fact that my kids watch more TV programming on their computers than on TVs
Subscribe to:
Posts (Atom)